Getting Started With The Opmantek VM

This page details the four simple steps you need to get started using the Opmantek Virtual Machine.

The virtual machine is a vendor neutral image (OVF) that can be converted and used with VMware (ESXi, Fusion, et al), Virtual Box, KVM and Hyper-V. It’s a quick and easy way to get up and running for Proof of Concepts, Trials and other scenarios where a full production install is not required. Download it, convert it and run it and you’re good to go.

Of course you may have requirements around configuring your Linux machines in a company standard way, and in that case our individual applications are also available to install on a machine built by you to your requirements. To download individual applications, you can here.

Step 1 – Download

Download the Opmantek Virtual Appliance from here.

Step 2 – Deploy

So you’ve downloaded the latest version of the Opmantek Virtual Appliance and now you want to set it up and take it for a test drive to see how NMIS and the Opmantek networking modules can help you administer your network. No problem. Easy. Simply:

  1. Import the OVA (Open Virtual Appliance Format) or OVF file into VMware, Virtualbox,…
  2. Start up the new VM, optionally set a static IP address.
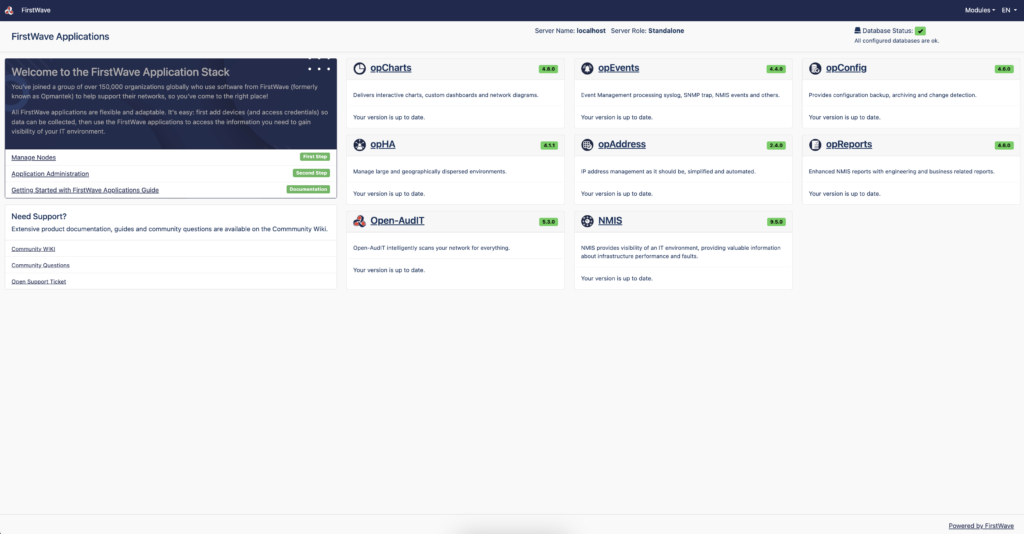
  3. Access NMIS and the other Opmantek applications in your browser.

For more details on how to do this including specific hypervisor detail, follow the instructions for your hypervisor of choice below:

Step 3 – Configure

Out of the box there is nothing to do – just start the virtual machine and connect to the application URL, done!

If you would like to configure the virtual machine to use HTTPS, set the hostname or set the IP options to your liking, see here – Getting Started, Configuring the Appliance

Step 4 – Run

Start the virtual machine and configure the application settings, see here – Getting Started, Configuring the Applications

Our individual applications are covered in great detail in their own wiki spaces (see below).

Uncategorized

Getting Started, Configuring the Appliance

Out of the box, the Opmantek VM requires no configuration changes to work, however you may wish to make changes so it complements your particular network environment. Items such as using HTTPS, setting the hostname or configuring the IP stack are all configurable.


Secure Access with https (optional)

The VM ships with support for secure https access enabled, and you can use https instead of http in any of the URLs mentioned.

However, the included certificate-key pair is the same for all VM downloads, and it is a self-signed certificate (for “opmantek.local”). This will cause your browser to display security warnings.

If you want to use https access operationally it is highly recommended that you replace this shared default key-certificate pair with your own (or use an automated certification authority like letsencrypt/ for example).

Debian – Customizing Network Settings (optional)

The Debian team has an excellent wiki page dedicated to customizing the network configuration; this page is available in several languages:

Debian Network Configuration

CentOS – Set a custom IP Address and DNS (optional)

At this point the VM has DHCP enabled, and therefore it will receive a dynamic IP address suitable for your environment. The easiest way to access the VM at that point is from the virtualization software terminal. So go ahead and boot the VM. After the VM is finished booting you will be welcomed by a login prompt. First, log in using the default credentials.

If it’s desirable to customize the network settings we offer the following options:

  • Option #1 – Manual configuration
    The VM appliance is a normal CentOS 7 system, hence all the mechanisms for network configuration in CentOS are available.
    Most specifically you’ll be interested in the  files:
    /etc/hosts/etc/sysconfig/network

    /etc/sysconfig/iptables

    /etc/sysconfig/network-scripts/<interface_name>

  • Option #2 – Use our example network configuration files
    Root’s home directory contains 2 example network configurations, one for static IP’s and one for DHCP.  Copy the one you require to /etc/sysconfig/network-scripts/ and edit it to suit:
    <code”>cp ifcfg-ens192.static /etc/sysconfig/network-scripts/ <interface_name></code”>

Be sure to verify the following settings:

  • IPADDR
  • NETMASK
  • BROADCAST
  • GATEWAY
  • NAME; the interface name as found with the ip address command
  • DEVICE; the interface name as found with the ip address command
  • DNS;

Next restart the network service for the setting to take affect.  In our testing the DHCP address was still present, and the static IP assigned as a secondary (this can be seen with the ‘ip address’ command).  The DHCP address can be removed by using the ‘ip address command del’ command or be rebooting the system.
TYPE=Ethernet
IPADDR=192.168.10.201
NETMASK=255.255.255.0
BROADCAST=192.168.10.255
GATEWAY=192.168.10.51
PROXY_METHOD=none
BROWSER_ONLY=no
BOOTPROTO=static
DEFROUTE= yes
IPV4_FAILURE_FATAL=no
IPV6INIT= yes
IPV6_AUTOCONF= yes
IPV6_DEFROUTE= yes
IPV6_FAILURE_FATAL=no
IPV6_ADDR_GEN_MODE=stable-privacy
NAME=enp0s3
UUID=9099afe7-6dd6-4aec-bd93-8950b67ab8f5
DEVICE=enp0s3
ONBOOT= yes
DNS1=192.168.10.80
DNS2=8.8.8.8

Uncategorized

Getting Started, Converting the OVF for Other Hypervisors

To use OVF/OVA files with other virtualisation systems like KVM you may have to convert the OVF file to a native format; Two well-known tools for this purpose are virt-v2v (available in CentOS6/RHEL) and virt-convert (in Debian).

Uncategorized

Getting Started, Converting the OVF for VMware vCenter

Importing the OVA file to an ESXi Datacenter via vCenter using VMware OVF Tool

  • NOTE – We do not support OVA import to VMware ESXi directly or via VMware vCenter using a browser.
  • NOTE – We require the VMware OVF Tool if importing to VMware ESXi directly or via VMware vCenter.
    • Numerous attempts were made to import this OVA using the VMware vSphere HTML5 Client, with Chrome, Chromium and Firefox as browser: Every attempt timed out.
    • We have yet to experience a failed import of this OVF using VMware commandline tool ovftool: For this reason VMware commandline tool ovftool is recommended for importing OVAs’ via VMware vCenter

You can import the OVA file into a VMware ESXi Datacenter via VMware vCenter using VMware ovftool, from the PC or server you run ovftool.
Remember to set the Virtual Machine name you like, the datastore you want, the network you want, and point it at the server you want to deploy to.
Run commands like this:

  • In this example the VMware vCenter 6.5 install has created:

    • FQDN ‘photon-machine’ with

      • user ‘administrator,

      • sso domain name ‘vsphere.localdomain, and

      • sso password ‘Vagrant1!

        • which must be escaped when used in this context using ovftool:

          • escaped  password: ‘Vagrant1\!

  • VMware ovftool option that should be determined appropriate to this use case for this OVA import:
    • -ds=”datastore_name-number”
      • Required if the selected Datacenter has more than one datastore
    • -nw=”network_name-number”
      • Required if the selected Datacenter has more than one network
    • -dm
      –diskMode

      Specify the disk format. You can specify the following formats:

      • monolithicSparse
      • monolithicFlat
      • twoGbMaxExtentSparse
      • twoGbMaxExtentFlat
      • seSparse (vSphere target)
      • eagerZeroedThick (vSphere target)
      • thin(vSphere target)
      • thick (vSphere target)
      • sparse
      • flat
Determine the Datacenter name: 

ovftool vi://administrator@vsphere.localdomain:Vagrant1\!@photon-machine

Error: Found wrong kind of object (Folder). Possible completions are:

Datacenter1/Determine the Datacenter available options:
ovftool vi://administrator@vsphere.localdomain:Vagrant1\!@photon-machine/Datacenter1/
Error: Found wrong kind of object (Datacenter). Possible completions are:
vm/
host/

Determine the Datacenter host IP or FQDN:
ovftool vi://administrator@vsphere.localdomain:Vagrant1\!@photon-machine/Datacenter1/host/
Error: Found wrong kind of object (Folder). Possible completions are:
172.16.37.128/

Import Opmantek-20200708-VM9-Centos7.2003-3-64bit.ova which is in the current directory, in this example using vSphere option –diskMode=thin:
ls -la
-rw-rw-r– 1 user user 903864320 Jul 29 13:09 Opmantek-20200708-VM9-Centos7.2003-3-64bit.ova

ovftool –acceptAllEulas –name=”omk_vm9_centos7″ –diskMode=thin Opmantek-20200708-VM9-Centos7.2003-3-64bit.ova vi://administrator@vsphere.localdomain:Vagrant1\!@photon-machine/Datacenter1/host/172.16.37.128
Opening OVA source: Opmantek-20200708-VM9-Centos7.2003-3-64bit.ova
Opening VI target: vi://administrator%40vsphere.localdomain@172.16.37.130:443/Datacenter1/host/172.16.37.128
Deploying to VI: vi://administrator%40vsphere.localdomain@172.16.37.130:443/Datacenter1/host/172.16.37.128
Transfer Completed
Warning:
– No supported manifest(sha1, sha256, sha512) entry found for: ‘omk-vm9-centos7-disk001.vmdk’.
– No supported manifest(sha1, sha256, sha512) entry found for: ‘omk-vm9-centos7-disk002.vmdk’.
– No manifest file found.
Completed successfully

Uncategorized

Getting Started, Converting the OVF for VMware ESXi

NOTE – We do not support OVA import to VMware ESXi directly or via VMware vCenter using a browser.

NOTE – We require the VMware OVF Tool if importing to VMware ESXi directly or via VMware vCenter:

Importing the OVA file directly to ESXi using VMware OVF Tool

You can import the OVA file directly into ESXi using VMware ovftool, from the PC or server you run ovftool.
Remember to set the Virtual Machine name you like, the datastore you want, the network you want, and point it at the server you want to deploy to.
Run the command like this:

ovftool –name=”NMIS9″ -dm=”thin” -ds=datastore_name-number -nw=”network_name-number” Opmantek-20200708-VM9-Centos7.2003-3-64bit.ova vi://user:escaped_password@host_ip_address
Opening OVA source: Opmantek-20200708-VM9-Centos7.2003-3-64bit.ova
Opening VI target: vi://user@host_ip_address:443/
Deploying to VI: vi://user@host_ip_address:443/
Transfer Completed
Warning:
– No supported manifest(sha1, sha256, sha512) entry found for: ‘omk-vm8-centos7-disk001.vmdk’.
– No supported manifest(sha1, sha256, sha512) entry found for: ‘omk-vm8-centos7-disk002.vmdk’.
– No manifest file found.
Completed successfully
Uncategorized