Managing a large complex environment with ever-changing operational states is challenging, to assist, NMIS as a Network Management System which is performing performance management and fault management simultaneously monitors the health and operational status of devices and creates several individual metrics as well as an overall metric for each device. This article explains what those metrics are and what they mean.
Summary
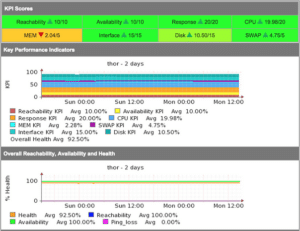
Consider this in the context that a network device offers a service, the service it offers is connectivity, while a router or switch is up and all the interfaces are available, it is truly up, and when it has no CPU load it is healthy, as the interfaces get utilised and the CPU is busy, it has less capacity remaining. The following statistics are considered part of the health of the device:
- Reachability – is it up or not;
- Availability – interface availability of all interfaces which are supposed to be up;
- Response Time;
- CPU;
- Memory;
All of these metrics are weighted and a health metric is created. This metric, when compared over time, should always indicate the relative health of the device. Interfaces which aren’t being used should be shut down so that the health metric remains realistic. The exact calculations can be seen in the runReach subroutine in nmis.pl.
Metric Details
Many people wanted network availability and many tools generated availability based on ping statistics and claimed success. This, however, was a poor solution, for example, the switch running the management server could be down and the management server would report that the whole network was down, which of course it wasn’t. OR worse, a device would be responding to a PING but many of its interfaces were down, so while it was reachable, it wasn’t really available.
So, it was determined that NMIS would use Reachability, Availability and Health to represent the network. Reachability being the pingability of device, Availability being (in the context of network gear) the interfaces which should be up, being up or not, e.g. interfaces which are “no shutdown” (ifAdminStatus = up) should be up, so a device with 10 interfaces of ifAdminStatus = up and ifOperStatus = up for 9 interfaces, the device would be 90% available.
Health is a composite metric, made up of many things depending on the device, router, CPU, memory. Something interesting here is that part of the health is made up of an inverse of interface utilisation, so an interface which has no utilisation will have a high health component, an interface which is highly utilised will reduce that metric. So the health is a reflection of load on the device and will be very dynamic.
The overall metric of a device is a composite metric made up of weighted values of the other metrics being collected. The formula for this is configurable so you can weight Reachability to be higher than it currently is, or lower, your choice.
Availability, ifAdminStatus and ifOperStatus
Availability is the interface availability, which is reflected in the SNMP metric ifOperStatus if an interface is ifAdminStatus = up and the ifOperStatus = up that is 100% for that interface if a device has 10 interfaces and all are ifAdminStatus = up and the ifOperStatus = up that is 100% for the device
If a device has 9 interfaces ifAdminStatus = up and the ifOperStatus = up and 1 interface ifAdminStatus = up and the ifOperStatus = down, that is 90% availability it is the availability of the network services which the router/switch offers
Configuring Metrics Weights
In the NMIS configuration, Config.nmis there are several configuration items for the these are as follows:
'metrics' => {

'weight_availability' => '0.1',

'weight_cpu' => '0.2',

'weight_int' => '0.3',

'weight_mem' => '0.1',

'weight_response' => '0.2',

'weight_reachability' => '0.1',

'metric_health' => '0.4',

'metric_availability' => '0.2',

'metric_reachability' => '0.4',

'average_decimals' => '2',

'average_diff' => '0.1',

},
The health metric uses items starting with “weight_” to weight the values into the health metric. The overall metric combines health, availability and reachability into a single metric for each device and for each group and ultimately the entire network.
If more weight should be given to interface utilisation and less to interface availability, these metrics can be tuned, for example, weight_availability could become 0.05 and weight_int could become 0.25, the resulting weights (weight_*) should add up to 100.
Other Metrics Configuration Options
Introduced in NMIS 8.5.2G are some additional configuration options to help how this all works, and to make it more or less responsive. The first two options are metric_comparison_first_period and metric_comparison_second_period, which are by default -8 hours and -16 hours.
These are the two main variables which control the comparisons you see in NMIS, the real-time health baselining. These two options will be calculations made from time now to time metric_comparison_first_period (8 hours ago) to calculations made from metric_comparison_first_period (8 hours ago) to metric_comparison_second_period (16 hours ago).
This means NMIS is comparing in real-time data from the last hour 8 hours to the 8 hour period before that. You can make this smaller or longer periods of time. In the lab I am running -4 hours and -8 hours, which makes the metrics a little more responsive to load and change.
The other new configuration option is metric_int_utilisation_above which is -1 by default. This means that interfaces with 0 (zero) utilisation will be counted into the overall interface utilisation metrics. So if you have a switch with 48 interfaces all active but basically no utilisation and two uplinks with 5 to 10% load, the average utilisation of the 48 interfaces is very low, so now we pick the highest of input and output utilisation and only add interfaces with utilisation above this configured amount, setting to 0.5 should produce more dynamic health metrics.
Metric Calculations Examples
Health Example
At the completion of a poll cycle for a node, some health metrics which have been cached are ready for calculating the health metric of a node, so let’s say the results for a router were:
- CPU = 20%
- Availability = 90%
- All Interface Utilisation = 10%
- Memory Free = 20%
- Response Time = 50ms
- Reachability = 100%
The first step is that the measured values are weighted so that they can be compared correctly. So if the CPU load is 20%, the weight for the health calculation will become 90%, if the response time is 100ms it will become 100%, but a response time of 500ms would become 60%, there is a subroutine weightResponseTime for this calculation.
So the weighted values would become:
- Weighted CPU = 90%
- Weighted Availability = 90% (does not require weighting, already in % where 100% is good)
- Weighted Interface Utilisation = 90% (100 less the actual total interface utilisation)
- Weighted Memory = 60%
- Weighted Response Time = 100%
- Weighted Reachability = 100% (does not require weighting, already in % where 100% is good)
NB. For servers, the interface weight is divided by two and used equally for interface utilisation and disk free.
These values are now dropped into the final calculation:
weight_cpu * 90 + weight_availability * 90 + weight_int * 90 + weight_mem * 60 + weight_response * 100 + weight_reachability * 100
which becomes “0.2 * 90 + 0.1 * 90 + 0.3 * 90 + 0.1 * 60 + 0.2 * 100 + 0.1 * 100” resulting in 90% for the health metric
The calculations can be seen in the collect debug, nmis.pl type=collect node=<NODENAME> debug=true
09:08:36 runReach, Starting node meatball, type=router

09:08:36 runReach, Outage for meatball is

09:08:36 runReach, Getting Interface Utilisation Health

09:08:36 runReach, Intf Summary in=0.00 out=0.00 intsumm=200 count=1

09:08:36 runReach, Intf Summary in=0.06 out=0.55 intsumm=399.39 count=2

09:08:36 runReach, Intf Summary in=8.47 out=5.81 intsumm=585.11 count=3

09:08:36 runReach, Intf Summary in=0.00 out=0.00 intsumm=785.11 count=4

09:08:36 runReach, Intf Summary in=0.06 out=0.56 intsumm=984.49 count=5

09:08:36 runReach, Intf Summary in=0.00 out=0.00 intsumm=1184.49 count=6

09:08:36 runReach, Intf Summary in=8.47 out=6.66 intsumm=1369.36 count=7

09:08:36 runReach, Intf Summary in=0.05 out=0.56 intsumm=1568.75 count=8

09:08:36 runReach, Calculation of health=96.11

09:08:36 runReach, Reachability and Metric Stats Summary

09:08:36 runReach, collect=true (Node table)

09:08:36 runReach, ping=100 (normalised)

09:08:36 runReach, cpuWeight=90 (normalised)

09:08:36 runReach, memWeight=100 (normalised)

09:08:36 runReach, intWeight=98.05 (100 less the actual total interface utilisation)

09:08:36 runReach, responseWeight=100 (normalised)

09:08:36 runReach, total number of interfaces=24

09:08:36 runReach, total number of interfaces up=7

09:08:36 runReach, total number of interfaces collected=8

09:08:36 runReach, total number of interfaces coll. up=6

09:08:36 runReach, availability=75

09:08:36 runReach, cpu=13

09:08:36 runReach, disk=0

09:08:36 runReach, health=96.11

09:08:36 runReach, intfColUp=6

09:08:36 runReach, intfCollect=8

09:08:36 runReach, intfTotal=24

09:08:36 runReach, intfUp=7

09:08:36 runReach, loss=0

09:08:36 runReach, mem=61.5342941922784

09:08:36 runReach, operCount=8

09:08:36 runReach, operStatus=600

09:08:36 runReach, reachability=100

09:08:36 runReach, responsetime=1.32
Metric Example
The metric calculations are much more straight forward, these calculations are done in a subroutine called getGroupSummary in NMIS.pm, for each node the availability, reachability and health are extracted from the nodes “reach” RRD file, and then weighted according to the configuration weights.
So based on our example before, the node would have the following values:
- Health = 90%
- Availability = 90%
- Reachability = 100%
The formula would become, “metric_health * 90 + metric_availability * 90 + metric_reachability * 100”, resulting in “0.4 * 90 + 0.2 * 90 + 0.4 * 100 = 94”, So a metric of 94 for this node, which is averaged with all the other nodes in this group, or the whole network to result in the metric for each group and the entire network.


")


")